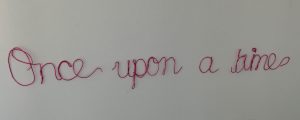
‘Once upon a time’: how to make handmade wire wall art
This cheap, simple and versatile handmade wire art simply adds personalisation to a space and interest to a wall, without being visually heavy.
Miss M has a lot of artwork on the walls of her room. Most of it is handmade, so I don’t have any second thoughts about replacing it. This one was something new, as a feature in her reading corner: the ‘Once upon a time’ handmade wire wall art.
Disclosure: This post contains affiliate links. If you use these links to make a purchase, I may earn a small commission at no extra cost to you.
Handmade wire wall art for our anniversary
This idea was not new to me. About two years ago I decided to make wire wall art of the song that Peter and I had at our wedding as an anniversary present.
At the time, I couldn’t find almost any tutorials online about how to make wire wall art. As I wanted something specific, it was difficult to find anyone who would make one of a specific phrase. So I decided just to make my own and came up with the tutorial as I went.
It still adorns the walls in our bedroom.

One for Miss M
When I decided to make some more handmade wire wall art for Miss M’s reading corner, I found a few shops on Etsy that sold the phrase I wanted, but none quite like I wanted (in pink!)
This time, I was tempted just to buy one, but in the end, I decided to make another one. It didn’t take long last time, with a much longer phrase. Miss M also asked for her

Tips
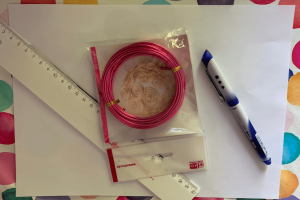
I used aluminium wire, 2mm diameter. I would not recommend using wire that is much thicker as it will get too difficult to bend. The wire should also not be too thin as it will not show up on the wall. To give you an idea of the length, I had five metres of wire and have about one metre left.
If you don’t want to use the guidance lines, you can just eyeball it and freehand your letters. Last time I did a little of both. However, I found where I used the guidance lines, the letters look better.
Alternatively, you can write the whole phrase out in large clear cursive letters on the paper (of even print out the letters if you wish). Then it is just a matter of bending the wire to form the letters in line with the handwritten (or printed) text.
Likewise, you can decide whether you want each word to be separate or whether you want to join the words of the phrases together. Last time I joined, this time I made each word individually.
The first couple of letters will take more time. After that, you will get the hang of it it will be finished quite quickly. I made this while eating breakfast this morning. Don’t judge me: I actually did not feel like going down to the cellar to get the wire cutters, so I just used the poultry shears from the kitchen. Worked a charm (the are also handy when I get fresh flowers).
One difficulty is considering how best to join the letters in a word together. Generally, the easiest way will be to “write” as if you were writing in cursive script. This will not work for all letter combinations, but it will for most.
Apart from choosing what to write, the most difficult part is hanging the finished piece on the wall in a straight line – and using nails that are small enough to camouflage.
‘Once upon a time’ handmade wire wall art

Handmade wire wall art
Materials
- 2mm wire any colour
- 1 piece paper any colour
- 20 small nails
Instructions
- Choose your word or phrase or line of poetry or line from a song.
- Decide on the approximate height that you want and draw guidance lines on the paper. You will need: one baseline, one for capital letters, one for letters with a tail (g, j, y, p, q), one for the upper limit of lower case letters and perhaps one or two for taller lower case letters, if you don't want these to be the same height as your capital letters (one for t, another line possibly for b, d, f, h, k and l).

- Using the lines as a guide, bend your wire to create the letters, holding them up to your guidance lines to check as you go. When you have all of your letters and words, check that they are straight (especially if you have decided to join them together).

- If you prefer: Write out your phrase in the size you want it, then bend the letter to follow your written words. When you have all of your letters and words, check that they are straight (especially if you have decided to join them together).
- Use the hammer and nails to attach to the wall, placing the nails at appropriate intervals.
Notes

Make your own handmade wire wall art
This simple project takes only a little time and a few ingredients to make and can really personalise a space. We used it to make the words of our first dance song from our wedding, but you could make the words of a favourite song, quote or nickname, for example.
It would make a lovely gift too – for a new baby (nursery) or anniversary, or even for a birthday or Christmas. The biggest question is: What words or phrase will you choose?


This is such a cute idea to add some wall art. I never would have thought of this thanks for the great idea
Would love to see what you decide on if you make one for yourself or someone else!
What a great idea this is…I might have to do one for work.
I sure it would look great with a short inspirational quote! Or even a cool hockey quote…