About me - image of me in the palace in Ferrera, done in Delauncy style
Hello! I'm Rachael!
  • About Tea with Mum
  • About Me
  • Work with Tea with Mum
  • Say hello!
  • About
  • Blog
    • Parenting
      • Bilinguals kids
    • Home hacks
    • Craft and DIY
      • Kid crafts
      • Seasonal crafts
    • Yum
      • Afternoon Tea
      • Cakes and biscuits
      • Desserts
      • Ice creams and sorbets
      • Salads & savories
      • Tea recipes
      • Traditional German recipes
      • Travel recipes
    • Travel
      • Australia
      • Dinosaurs
      • Europe
      • Middle East
      • Parks, museums and zoos
      • Travel tips
    • Life and loss
  • Say hello!
  • Little helpers

Tea with Mum

Steeping the Soul

Craft and DIY, Kid crafts, Seasonal crafts · 23 March 2020

Easy faux stained glass Easter art

With so many families dealing with or facing school shutdowns, we thought it might be nice to share another one of the projects we’ve been working on this week. This faux stained glass Easter art is simple to make and requires almost no supplies. It’s fun and easy and looks great on your windows. Why not make some with your kids while they are stuck at home?

The finished faux stained glass Easter art, ready for hanging

The inspiration

A while ago, I saw this faux stained glass project done by Ashley of At home with Ashley. It was actually one of the projects that made me decide to follow her blog.

Around the same time, we visited the Cologne cathedral again. I just love this stained glass window and would love to make something along these lines using Ashley’s technique one day.

My favourite stained glass window at the Cologne Cathedral

But let’s be real. We are in isolation and the shops that are open do not sell the goods needed for the project. It is one that will have to wait. no, now we will need to go with something significantly simpler.

Instead, we took our inspiration from our DIY graphic watercolour art.

I vaguely remembered making artwork for the windows while I was at school. I know, a long time ago. Still, I know it would be low tech and I was likely to have everything we would need. Once I remembered how to make it, I was right.

This mini project is also a great one to do to brighten up your neighbourhood. In our area, children (I assume) are drawing bright pictures and putting them up in their windows for others to see when they are out walking. This simple act is just one way that children can influence the world around them at this difficult time.

Our faux stained glass Easter art, hanging on our window

Tips for making your faux stained glass Easter art

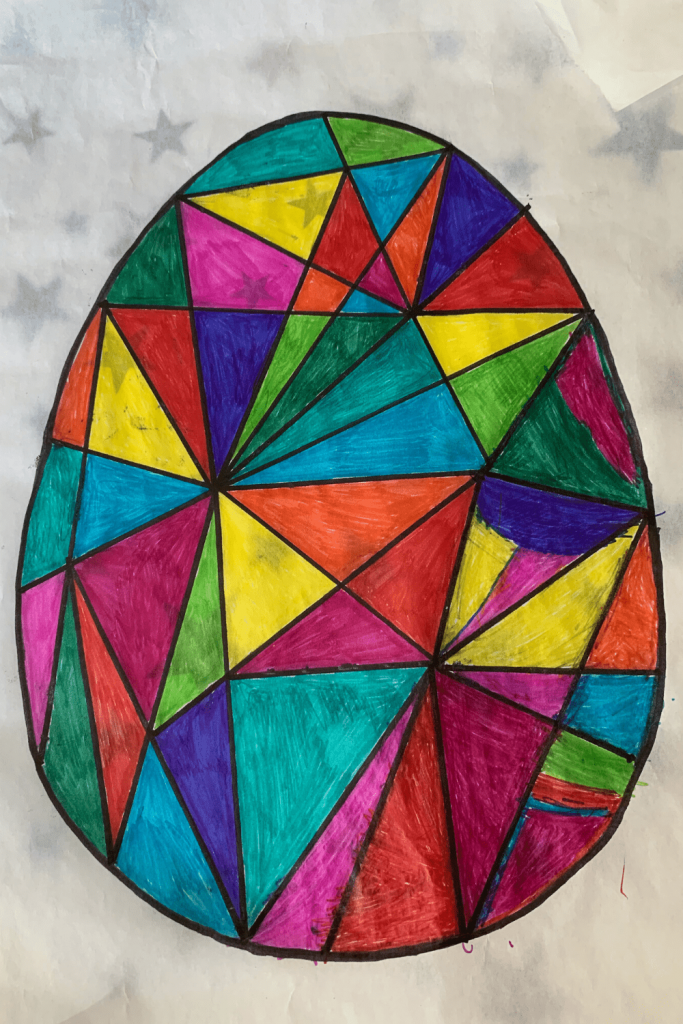
This art project is so easy, I really only have one tip: use bright-coloured markers. Nice clear colours – not pastels – work best.

You also do not need to make an egg. As we did with our graphic watercolour art, you could try a graphic rabbit shape. Or perhaps a flower? Or make an image that has little to do with Easter. If we can find enough markers with slightly different shades of the same colours, we are thinking of making a rainbow. I will post an update if we do.

Make some faux stained glass Easter art to brighten your windows

The beauty of this faux stained glass Easter art is its simplicity. You need almost nothing to make one for your own windows and it is likely that you will have all that you need in your cupboards. It’s definitely the type of project I like: maximum impact from minimal cost and effort.

Why not make some with your kids today?

Scandinavian-inspired Easter decor: faux stained glass Easter Art; with close up image; banner

Faux stained glass Easter art

What you need

  • grease-proof paper
  • felt-tipped pens
  • ruler
  • egg form
  • scissors
  • A piece of coloured cardboard or card, preferably black (optional)
  • Sticky tape
What you need to make the faux stained glass Easter art

How to make your faux stained glass Easter art

1. Find or draw your egg form in the size you wish and cut it out to use as a template.

2. Trace the template onto a piece of grease-proof paper and outline the form in black marker.

3. Mark the outline at intervals with a dot then mark 3-4 points randomly within the egg shape also with a dot.

4. Use the rule and black marker to draw lines to connect the dots until you have a design that you are happy with.

First steps for making the faux stained glass Easter art: egg outlined on grease-proof paper, lines drawn to connect the dots and the first segments coloured in

5. Use bright felt tips markers to colour in each of the shapes formed by connecting the dots.

6. If you wish, trace the egg shape onto your piece of card and cut it out to create a frame for your faux stained glass Easter egg. Cut out your finished egg and use some tape to ‘mount’ it in the frame then attach it to a window. I actually made a frame (in blue, I did not have any black), but Miss M decided she preferred it without a frame.

Close up of our faux stained glass
Happy Crafting Sign-off
An easy Easter craft to make with kids: Faux stained glass Easter art, with image of rainbow coloured Easter egg on a window

Posted In: Craft and DIY, Kid crafts, Seasonal crafts · Tagged: Brighten up your space with DIY Easter art, DIY Easter deco, DIY Easter decorations, Easy DIY project, Easy Easter art project, faux stained glass, kids crafts, scandi inspired Easter deco, scandinavian easter decorations

Want to see what we’ve got brewing?

Subscribe to our emails for exclusive content and sneak peeks. As a gift, we'll give you access to all our Little helpers.

Privacy Policy

By subscribing, you confirm that you have read and accept the Tea with Mum Privacy policy. You can unsubscribe at any time.

You’ll Also Love

A Scandinavian-inspired Easter: Versatile beaded Easter bunnies, with a picture of three rainbow-coloured beaded Easter bunnies on a blue backgroundVersatile beaded Easter bunnies: simple Scandinavian-inspired Easter decorations
Environmentally-friendly and easy DIY wax cloth food wrap; FB size; title with image of wrap with unicorns in a forest, being used to wrap a bagelEnvironmentally-friendly DIY wax cloth food wraps
Fun and easy beach bag titleHow to make a fun and easy beach bag

Leave a Reply Cancel reply

Your email address will not be published. Required fields are marked *

Recipe Rating


Next Post >

Versatile beaded Easter bunnies: simple Scandinavian-inspired Easter decorations

Hi and welcome to Tea with Mum. Follow us as we steep our soul and share our travels, parenting tips, tasty recipes, easy crafts & thoughts on life & loss, one cup at a time.
Happy Spring sidebar image, with a watercolour image of a bicycle

New Little Helpers

Little helpers banner: Let us help you: Little helpers: Free access when you subscribe: with watercolor image of paperclip with ribbon

Stay updated

Access all our Little helpers as a gift when you subscribe to our newsletter!

You can unsubscribe at any time.

Search

Categories

  • Parenting
  • Home hacks
  • Craft and DIY
  • Yum
  • Travel
  • Life and loss

hello!

I’m Rachael and these are my chats with my late Mum over a cup of tea. Let's make your life easier with simple & delicious recipes, easy craft ideas, home hacks, parenting tips, travel hints, tricks & itineraries and tonnes of Little helpers. Come share our adventures and take time for tea.

Who and what

  • About Tea with Mum
  • About me
  • Say hello
  • Work with us

Shop My Favourites

  • Travel essentials
  • Kitchen tools
  • Kid’s stuff
  • Craft supplies
  • Blogging resources

Travel

  • Europe
  • Australia
  • Parks, museums and zoos
  • Travel tips
  • Dinosaurs

Yum

  • Cakes and biscuits
  • Ice creams and sorbets
  • Travel recipes
  • Tea recipes
  • Privacy Policy
  • Disclosure
  • Terms of Use

Copyright © 2022 Tea with Mum · Theme by 17th Avenue