About me - image of me in the palace in Ferrera, done in Delauncy style
Hello! I'm Rachael!
  • About Tea with Mum
  • About Me
  • Work with Tea with Mum
  • Say hello!
  • About
  • Blog
    • Parenting
      • Bilinguals kids
    • Home hacks
    • Craft and DIY
      • Kid crafts
      • Seasonal crafts
    • Yum
      • Afternoon Tea
      • Cakes and biscuits
      • Desserts
      • Ice creams and sorbets
      • Salads & savories
      • Tea recipes
      • Traditional German recipes
      • Travel recipes
    • Travel
      • Australia
      • Dinosaurs
      • Europe
      • Middle East
      • Parks, museums and zoos
      • Travel tips
    • Life and loss
  • Say hello!
  • Little helpers

Tea with Mum

Steeping the Soul

Craft and DIY, Seasonal crafts · 11 April 2019

Eye-catching graphic watercolour Easter art in just four easy steps (you don’t even need step 4!)

As I mentioned before, I am on a quest this year to bring more Easter cheer into our house this Easter. To do that, I’ve come up with some simple Scandinavian inspired easter decorations. The second Easter decor project is our graphic watercolour Easter art – some simple wall art, which is both watercolour and geometric. It was very quick and easy to make, so easy in fact that our three-year-old even assisted, at least with step two.

Easy graphic watercolour egg art; How to make your own eye-catching but simple graphic watercolour Easter art in 4 easy steps - so easy a small child can help!

Graphic watercolour Easter art

What you need

The beauty of this graphic watercolour Easter art project is not just that it is so simple that a three-year-old can help, but that you need nearly nothing to make your own.

  • Cardstock or aquarelle paper
  • Watercolour paints or pencils (or whatever you prefer to use for your watercolour work)
  • Paintbrush and water
  • Black marker (I used a 1.5 – 3 mm marker from Edding)
  • Ruler
  • Frame, such as the simple IKEA Fiskbo frame.
Eye-catching graphic watercolour Easter art: finished product, with tools needed to make it including the 'form'

Instructions

1. Choose your shape

The first step is to decide on what motif to use for your graphic. I chose a bunny for one piece and some eggs for Easter. I downloaded my egg shape online and just printed it out, scaled to three different sizes.

I could imagine a wreath or star for Christmas, a star for July 4th, a pumpkin for Autumn, a maple leaf for Canada Day, a heart for Valentine’s Day or a balloon for a birthday. I’m actually planning to make a big M for Miss M’s room in this style.

Cut out each shape, place over the cardstock or page where you want the image to be and trace around the shape. Alternatively, you can just draw the outline of your image freehand.

2. Add the watercolour

Eye-catching graphic watercolour Easter art: the watercolour background (outside of the shape) done using watercolour pencils

Once you have the outline, use watercolour paint or pencils, or even watered down acrylic paint, to paint your watercolour background for your graphic watercolour Easter art. There are two different approaches you can take here. I tried both and they each have their charm.

One is to keep the watercolour within the form, where possible. The group of three eggs and the bunny are just done with watercolour paints on cardstock using this technique.

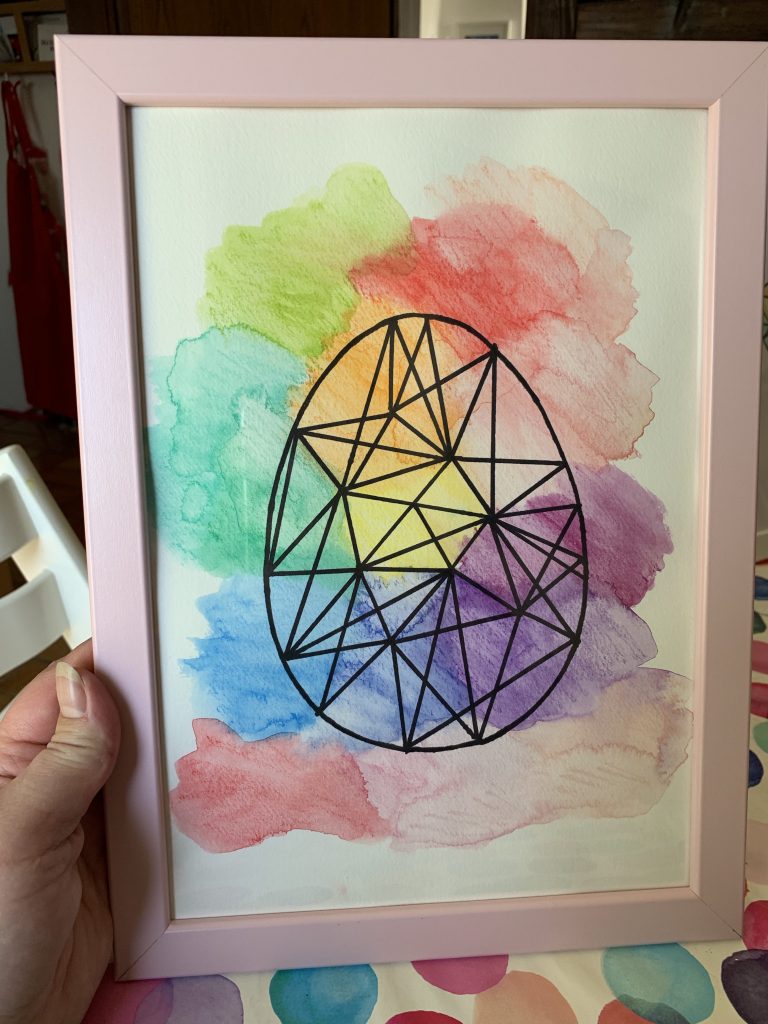
Alternatively, you can let the colour bleed outside the motif or even deliberately paint outside the shape. The additional egg was done with watercolour pencils on aquarelle paper. Just shade the area you want with the colours you want, then lightly brush with water.

Miss M helped with both alternatives. Admittedly, her main job was pointing to where I should put each colour, but she also did some of the painting for the larger egg.

3. Add the graphic elements

Once the paint has dried, take your black marker and outline your shape, simply drawing over the pencil outline you created in the first step.

Pick and mark a number of random points around the outline as well as ‘intersections’ within the shape and mark these with a dot. I found it easiest to pick points where different watercolours met.

Eye-catching graphic watercolour Easter art: adding the graphic elements. First outline the shape, then add intersections and connect the intersections together.

Using a ruler, draw a line connecting one point and the closest intersection. Continue to do the same with the next point, and the next, then draw lines (with the ruler) to connect each intersection with one another. If needed, add more intersections. Continue until you like the look.

4. Frame

Finally, frame and hang (or lean) your graphic watercolour Easter art and enjoy!

Step 4: Frame and hang. Easy graphic watercolour bunny art, framed

Make your own graphic watercolour Easter art

I love it when a project comes together just the way I imagined! This graphic watercolour Easter art took next to no time. Seriously, waiting for the paint to dry took much longer than the rest of the steps.

They are so simple, too. You need almost nothing to make them and a young child can even help with the most enjoyable step.

Finally, you can simply choose the colours and the motif to suit your decor. In our case, we wanted happy rainbows to chase away the bad associations with Easter.

How to make your own simple and colourful graphic watercolour Easter art; simple, Scandi-inspired Easter decor

So there really is no excuse: make some graphic watercolour Easter art this Easter!

Don’t forget to check out our wire Easter egg ears and our Scandi-inspired Easter decor.

Happy crafting sign off
How to make your own simple and colourful graphic watercolour Easter art; watercolour Easter bunny; simple, Scandi-inspired Easter decor


Posted In: Craft and DIY, Seasonal crafts · Tagged: Brighten up your space with DIY Easter art, DIY Danish design wall art, Easy Easter art project, easy Easter wall art, geometric bunnies, geometric eggs, scandi inspired wall art, scandinavian easter decorations, water color geometric wall art, watercolor geometric wall art, Watercolour geometric wall art

Want to see what we’ve got brewing?

Subscribe to our emails for exclusive content and sneak peeks. As a gift, we'll give you access to all our Little helpers.

Privacy Policy

By subscribing, you confirm that you have read and accept the Tea with Mum Privacy policy. You can unsubscribe at any time.

You’ll Also Love

A Scandinavian-inspired Easter: Faux stained glass Easter art, with a close up of our faux stained glass Easter eggEasy faux stained glass Easter art
A Scandinavian-inspired Easter: Versatile beaded Easter bunnies, with a picture of three rainbow-coloured beaded Easter bunnies on a blue backgroundVersatile beaded Easter bunnies: simple Scandinavian-inspired Easter decorations
Simple Autumn deco: Easy DIY Autumn art (picture frame snow globe), napkin pumpkins and some ceramic pumpkins: with photo of colorful napkin pumpkins in the backgroundEasy DIY Autumn art and 3 other simple Fall decor ideas

Leave a Reply Cancel reply

Your email address will not be published. Required fields are marked *

Recipe Rating


Next Post >

The Bernissart Dinosaurs

Hi and welcome to Tea with Mum. Follow us as we steep our soul and share our travels, parenting tips, tasty recipes, easy crafts & thoughts on life & loss, one cup at a time.
Happy Spring sidebar image, with a watercolour image of a bicycle

New Little Helpers

Little helpers banner: Let us help you: Little helpers: Free access when you subscribe: with watercolor image of paperclip with ribbon

Stay updated

Access all our Little helpers as a gift when you subscribe to our newsletter!

You can unsubscribe at any time.

Search

Categories

  • Parenting
  • Home hacks
  • Craft and DIY
  • Yum
  • Travel
  • Life and loss

hello!

I’m Rachael and these are my chats with my late Mum over a cup of tea. Let's make your life easier with simple & delicious recipes, easy craft ideas, home hacks, parenting tips, travel hints, tricks & itineraries and tonnes of Little helpers. Come share our adventures and take time for tea.

Who and what

  • About Tea with Mum
  • About me
  • Say hello
  • Work with us

Shop My Favourites

  • Travel essentials
  • Kitchen tools
  • Kid’s stuff
  • Craft supplies
  • Blogging resources

Travel

  • Europe
  • Australia
  • Parks, museums and zoos
  • Travel tips
  • Dinosaurs

Yum

  • Cakes and biscuits
  • Ice creams and sorbets
  • Travel recipes
  • Tea recipes
  • Privacy Policy
  • Disclosure
  • Terms of Use

Copyright © 2022 Tea with Mum · Theme by 17th Avenue